Tag: Recipe

Cook, Eat | Chorizo, Tomato and Paprika Free-range Egg Bake Recipe

Cook, Eat | Chorizo, Tomato and Paprika Free-range Egg Bake Recipe

Chorizo, Tomato and Paprika Free-range Egg Bake Download recipe card here Serves 2 Ingredients: 1 tablespoon olive oil 80g chorizo,diced 1 clove garlic, crushed 1 small onion, fine dice 250g cherry tomatoes 4 free range eggs 1 cup cannellini beans with juice Handful parsley,chopped Smoked 

Easy Greek Salad Recipe with Ghiotti Sicilian Green olives

Easy Greek Salad Recipe with Ghiotti Sicilian Green olives

We found we had an abundance of both cucumbers and capsicums in the weekend so Dave whipped up this amazing 5 minute salad which we enjoyed two ways; the first as an accompaniment to some hot salami and crackers as an afternoon snack and secondly 

Sugarfree Cupcake Recipe + Edmonds Classics Giveaway!

Sugarfree Cupcake Recipe + Edmonds Classics Giveaway!

Sugar Free Cupcake Recipe NZ Mummy Blog

Of all the cookbooks I own, the most thumbed, the most flour coated, the one with the most pages stuck together with icing is The Edmonds Cookery Book.  It’s to this veritable kiwi institution that Dave and I turn for every tried and true family favorite.  There has been no greater compendium of the smells and tastes of my childhood with which to introduce my American husband to the food of New Zealand.  

So, with a little recipe modification on the cards, I knew I could rely on the rock solid foundation of the traditional Edmonds cupcake recipe. I had never tried a sugar substitute before as I’m quite a full fat, butter, gluten and sugar loving kind of girl, but, why consume extra calories when you don’t have to right?  Natvia sent me a box of their products to try, all natural sweeteners derived from the stevia plant.  I thought what the heck, might as well jump in the deep end and try and replicate the very traditional Edmonds Cup Cake recipe (modified for use with Natvia), complete with vanilla buttercream icing.  

First challenge: cupcakes.

Following the tips that were included in my package of Natvia, I switched out butter for oil 1:1, I increased the milk content from 1/4 cup to 1/2 cup and increased the baking powder content by 1 teaspoon.  Result: Perfect cupcakes!  These were moist, well formed, rose just the right amount and nice and flat, making icing easy.

Sugar Free Cupcake Recipe NZ Mummy Blog
Next challenge: Buttercream icing.

So one of the tips for using Natvia successfully in baking is to cream the butter on its own before adding sweetener.  Did this and made the recipe on the box of Natvia Icing Mix, and….. not bad.  A little grainy – you can see this in the image above – and there was a slight aftertaste present that is absent in the baked cake.  But, would I use it again?  Totally.  How many cupcakes do you, should you, eat in one sitting anyway?  I love that I could serve these to my kids and not worry about the sugar content. Nixie loved his cupcake by the way – and no mental-toddler-sugar-rush to deal with afterwards. Win.  Win.  Win.

Today sees the release of Edmonds Classics, a revised edition compiling New Zealand’s favorite Edmonds recipes as surveyed by The New Zealand Woman’s Weekly late last year.  New additions to the Top 20 include the classic Pavlova – of course – and Cinnamon Cream Oysters {?!}.  You can pick up this must-have kitchen essential wherever good books are sold for $29.99 or you can win one on my Facebook page by commenting on the competition image with your favorite Edmonds recipe!  Winner drawn Monday 20th April.

Edmonds Classics REcipe Book NZ Blogger

  • [yumprint-recipe id=’8′]
Cook Eat | Mini Frittata Recipe

Cook Eat | Mini Frittata Recipe

We are crazy about eggs in this house {I’m pretty sure I’ve told you that about 100 times already!}, but everyone in our house LOVES eggs.  We go through around 2 trays a week and eat eggs made every way imaginable, a couple of times 

Cook Eat | Coconut Milk Smoothie Recipe

Cook Eat | Coconut Milk Smoothie Recipe

Vitasoy have been so kind as to send us some samples of their new Coconut Milk, so we have been busy recipe testing and finding ways in which we can incorporate this yummy, dairy-free milk option into our family diet.  We have all switched to 

Cook Eat | Cinnamon & Brown Sugar Brioche Recipe

Cook Eat | Cinnamon & Brown Sugar Brioche Recipe


These puppies are bad news brown.  Don’t make them then come crying to me all like “I’ve put on 27 kilos because of BRIOCHE”.  I know, I feel your pain, now eat you pain away, brioche makes everything better x

The basic dough recipe is from the Little and Friday Cookbook – Celebrations, the method is mine x

This is not a quick recipe so stick with scones if you’re in a hurry. 

[yumprint-recipe id=’6′] 


{CLOSED} Cook Eat | Miso Hoki Recipe + GIVEAWAY!

{CLOSED} Cook Eat | Miso Hoki Recipe + GIVEAWAY!

  Dave and I attended an awesome Supper Club hosted by Sealord on Tuesday night which saw Trudi Nelson from www.fresh.co.nz cooking up some divine recipes using fresh Hoki.  Previously I had been a bit turned off by Hoki, my experience was that it was a bit 

Cook, Eat | Smoked Fish Pie Recipe

Cook, Eat | Smoked Fish Pie Recipe

So many iconic New Zealand brands are participating in New World’s Little Shop promotion but Sealord have taken it one step further this year; they have built two fully functioning Little Boats, complete with engine and rudder which will be given away to two lucky 

How to | Our Water Kefir Routine

How to | Our Water Kefir Routine

About 6 weeks ago, my good friend Debbie gifted us some water kefir grains and a bottle of her own fermentation to see if we even liked it!  We did, we ALL loved it and after a few hiccups initially things are brewing along smoothly!  I now have two jars fermenting, ready on alternate days and the kefir grains have multiplied enough for me to prepare two new starters to gift to some lovely ladies this week.  What is kefir? Originating in Mexico, water kefir grains (also known as Sugar Kefir Grains) allow for the fermentation of sugar water or juice to create a carbonated lacto-fermented beverage.  The ‘grains’ are not grains at all but little globules of bacteria and yeast which work their magic in the sugar water, the result is a great tasting, fizzy, probiotic and viatmin filled healthy alternative to juice etc.
So, what’s involved?  Follow the steps below and have a look;

water-kefir-mummy-blog-nz

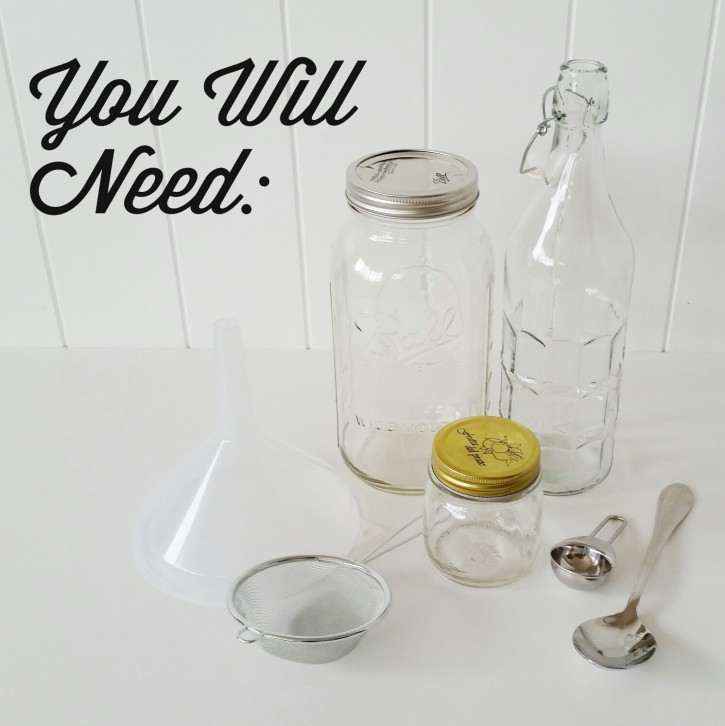
Getting started with water kefir grains is easy, and definitely made easier by having everything you need on hand.  

  1. Large glass Ball jar or similar, this one holds 1.5 litres and I picked it up at Junk n Disorderly
  2. Glass bottle, Dave found this one at a dollar store for around $3, but you may have ones you can recycle at home – Antipodes water bottles are perfect!
  3. Small glass jar.  Your kefir grains will multiply so be prepared to store them in the fridge when you find you have an excess
  4. Funnel that will fit in the mouth of your glass bottle
  5. Sieve
  6. Tablespoon and long handled spoon

water-kefir-mummy-blog-nz

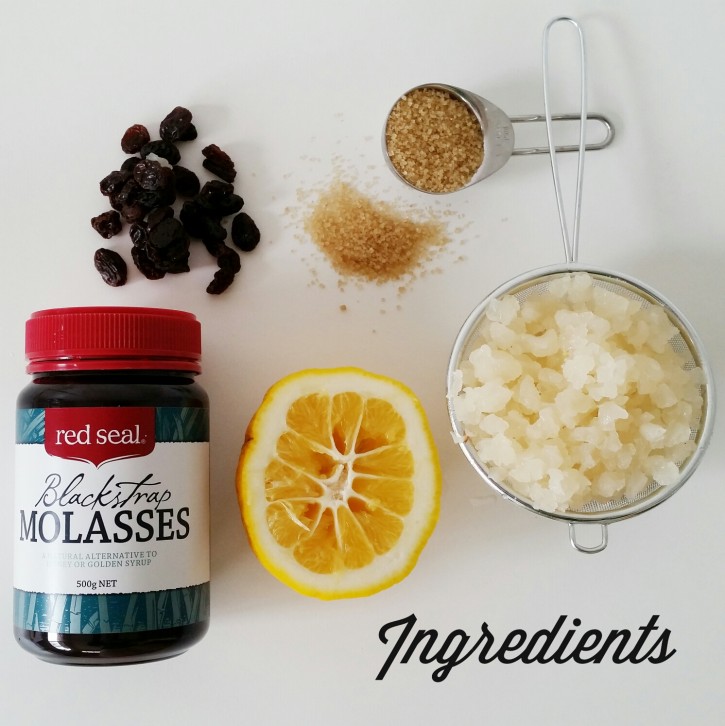
  1. 6 tblsp water kefir grains {if you are unable to source any from friends you can purchase kefir grains here}
  2. 4 tblsp raw sugar
  3. 1 tblsp raisins
  4. Half a lemon
  5. 1/2 tsp Black Strap Molasses {optional}
  6. 3 cups water
  7. Pinch of baking soda

water-kefir-mummy-blog-nz

Step 1:  Add your 4 tablespoons of raw sugar, 3 cups of water and 6 tablespoons of kefir grains into your large jar in this order.  If you add the sugar after the kefir you can end up with cloudy broken grains.

water-kefir-mummy-blog-nz

Step 2:  Add your raisins, molasses if you want, a pinch of baking soda and half a lemon.  Try and pick as many pips out as you can before adding your lemon, then you won’t have to separate them from the kefir grains later.

Step 3:  Store in a dark, warmish place for approx 48 hours until you see your raisins float, see pic below.

water-kefir-mummy-blog-nz

water-kefir-mummy-blog-nz

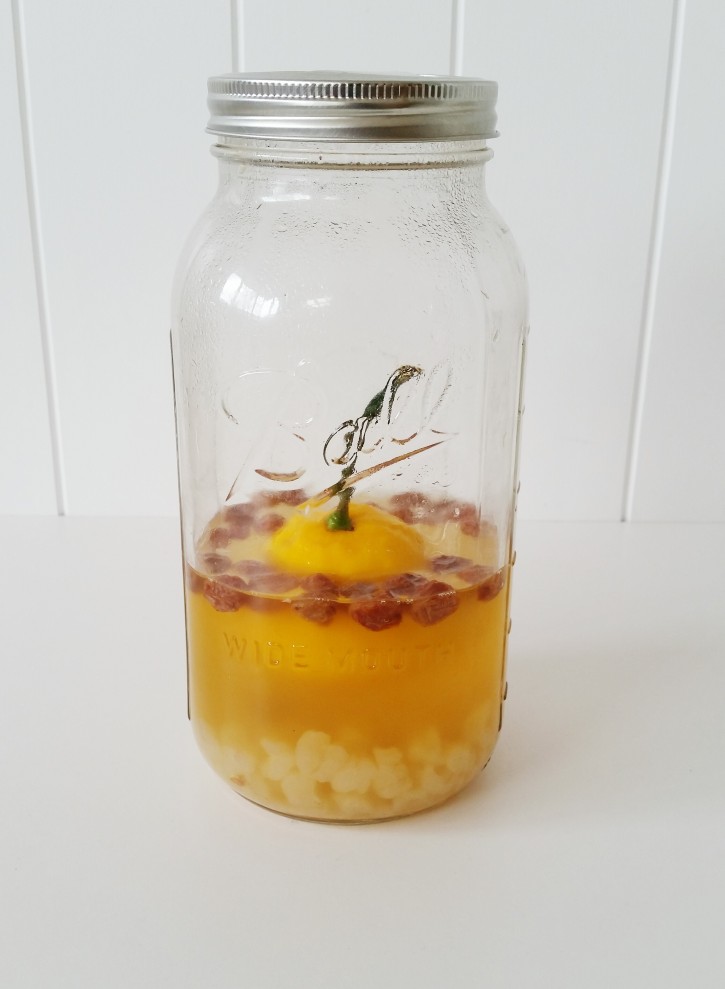
This pic shows why you need such a big jar when you are only adding 3 cups of water; the fermentation process omits a lot of gas causing pressure to build inside the jar – see how my mighty kefirs have popped up the lid?  If your jar is too small you may risk a kefir explosion!

water-kefir-mummy-blog-nz

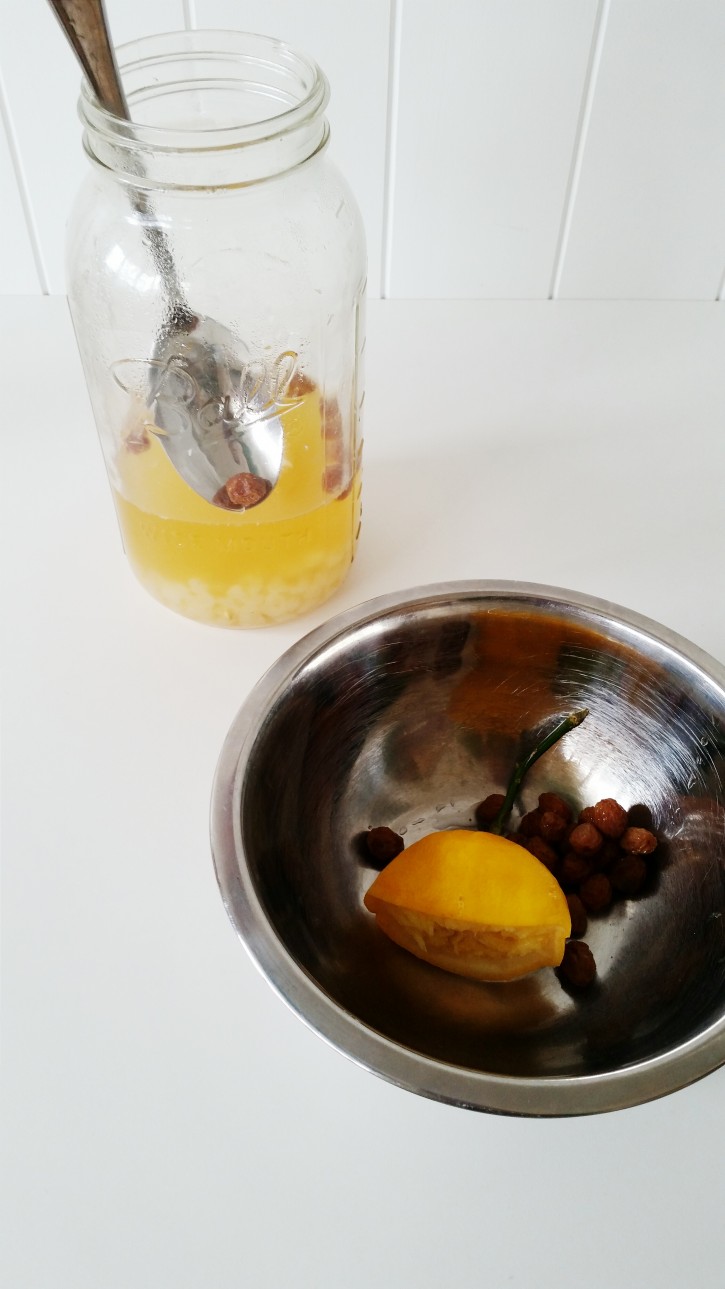
Step 4: Once your raisins are floating, scoop them out, also remove the lemon, squeezing the juice back into your jar.

water-kefir-mummy-blog-nz

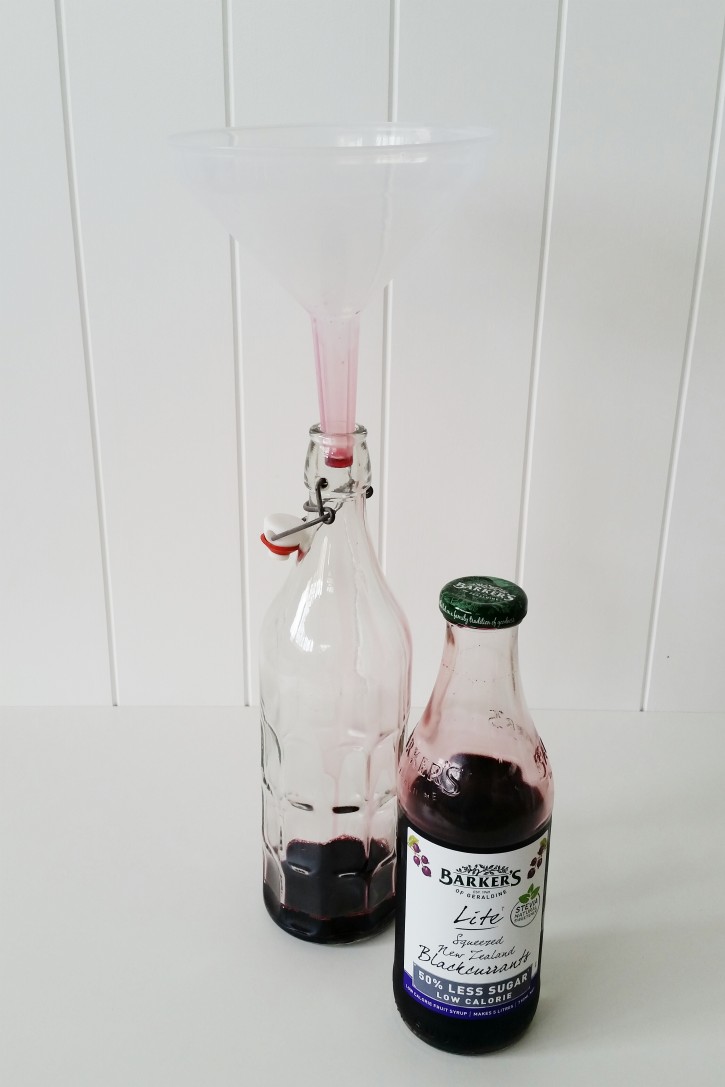
Step 5: Prepare your bottle for the second fermentation.  If you choose to flavour your kefir add this now.  I’m loving the Barker’s Lite Blackcurrant flavour at the moment.  If you aren’t adding any flavour just stick your funnel in the bottle.

water-kefir-mummy-blog-nz

Step 6:  Using your funnel and sieve pour the liquid from your large jar into the bottle, seal and pop back in the dark cupboard for another 24 hours.

water-kefir-mummy-blog-nz

Step 7: Refrigerate and enjoy!

As I mentioned earlier, the kefir grains will multiply so when you notice you have a bit more than the 6 tablespoons required for a fermentation, place the excess in a small jar in the fridge with 1 tablespoon of sugar and enough water to keep them covered plus a bit more.  Your kefir grains are now ready for more, so give them a light rinse and begin again from Step 1!


Cook Eat | Tomato Chutney Recipe

Cook Eat | Tomato Chutney Recipe

I have grown us a bounty of tomatoes this season, and despite our best efforts we are accumulating a bit of a back-log. Time for chutney. Ingredients 1.25kg green or firm tomatoes chopped (I used some red ones also) 3 chopped onions 2 chopped apples